
The primary objective of this integration is to send as much customer, transaction, tender and item information, as possible to flexEngage. flexEngage then digitizes the entire transaction for the end consumer, and provides detailed statistics & analytics for the merchant.
This Integration Guide provides integrators with detailed descriptions on how to connect with and test the flexEngage web services. This guide does not provide instructions on Point of Sale (POS) specific integration steps.
This guide is for an integrator/developer that is looking to integrate a Point of Sale (POS) system with the flexEngage web services. This integration provides digital receipts to consumers as part of the checkout process. This document should be used in conjunction with the flexEngage Integration Test Guide, which provides steps to test the POS integration and ensure the digital receipt functionality performs as expected. The Technical Services team will provide you with the flexEngage Integration Test Guide.
The schema for this web service is published as an OpenAPI 3 specification — see the Receipts API.
The Technical Services team will provide you with the endpoint connectivity information for both the test and production environments through the Merchant Access Form.
Test: https://api-test.flexreceipts-lab.com/ws/rest/v1/merchants/[MERCHANT-ID]/receipts
(Note: Replace [MERCHANT-ID] with the merchant ID that was provided by flexEngage.)
Production: The endpoint for the production environment is given at the time of production deployment as coordinated with flexEngage.
The fully-qualified absolute URL of the endpoint/s should be configurable values on the POS to allow flexibility — move from one environment to another (e.g., test environment to production environment).
All communication with flexEngage web services are done over an encrypted TLS connection. For performance purposes and because of the “Poodle” vulnerability with SSL v3.0, flexEngage is optimized for TLS 1.2. The POS should use the root certificate and not sub certificates for api.flexreceipts.com or api-test.flexreceipts.com.
You should be using a TLS implementation that supports Server Name Identification (SNI). If you do not, you could encounter certificate issues with one or more of our environments. Contact flexEngage if your TLS implementation does not support SNI.
flexEngage provides the Merchant with API keys to be used as credentials for all web service requests. Credentials must be transmitted using HTTP Basic Authentication. Depending upon the programming language used, there should be a library which makes this easy to do.
flexEngage uses store locale mappings to determine receipt language. To use this feature, you must:
Accept-Language: fr_CA
Content-Length: 11195
Host: api.flexEngage.com:443
Connection: Keep-Alive
User-Agent: Apache-HttpClient/4.1.1 (java 1.5)
Authorization: Basic YUdjMGRtdHdiR0YzZDFZNEs…….
The POS integration with flexEngage (e.g., Web Services, POS UI) should be configurable so that operations can be modified without code changes. See Point of Sale UI Guidelines for examples of features that should be configurable.
In order to test with flexEngage you must contact flexEngage Support to setup a test account. flexEngage must be notified in advance of any testing in the flexEngage integration test environment. Contact your flexEngage representative for instructions on how to contact flexEngage Support.
NOTE: Testing in the flexEngage Production environment is strictly prohibited. All production deployments must be coordinated with the flexEngage team ahead of time, and a flexEngage representative must be involved with the deployment.
In the event that post-deployment production troubleshooting (that cannot be satisfied in the flexEngage test environment) is required, the integrator must submit a written request to flexEngage to schedule a limited test against the flexEngage production environment. The following restrictions apply to all testing requests:
Intentionally sending fake email addresses when testing is prohibited. flexEngage recommends that you register a test domain name and create a test “catch-all” email account where any email sent to that domain is sent to the “catch-all” email account. This allows you to create an unlimited number of valid test email addresses. Most email providers have this feature. Below is a screenshot of that setting in Godaddy email. For additional information please contact flexEngage Support.
Catch-all setting in Godaddy email
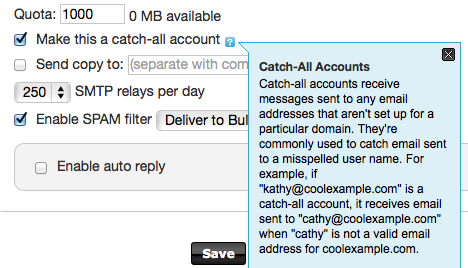
If the API is not reachable (e.g., store network connectivity is down), then failed API requests should queued up and sent when access to the API is available again.
This can be accomplished by setting up a folder where failed API requests are stored and reprocessed from when access to the API is restored.
There is one (1) main service that the POS uses to create a digital receipt:
Receipt
This service sends as much customer, transaction, tender and item information, as possible to flexEngage. flexEngage then digitizes the entire transaction for the end consumer, and provides detailed statistics & analytics for the merchant.
| Receipt Request | POS sends transaction information to flexEngage and determines whether to generate a digital receipt. |
| Receipt Response | flexEngage returns a message to the POS, providing a digital receipt confirmation or errors/warnings. NOTE: The POS should not close out the transaction until the Receipt Response is received and processed. |
The flow below gives an overview of how flexEngage expects to interact with the POS during the checkout process.
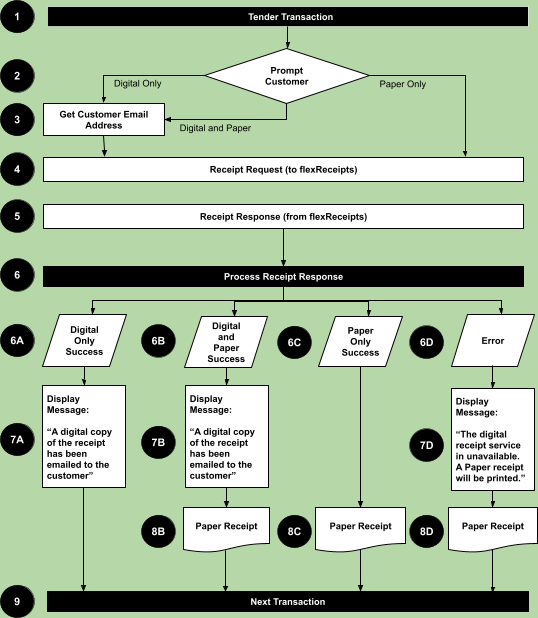
Process Flow Step Breakdown:
Step 1: The POS tenders the current transaction.
Step 2: The POS prompts the Customer or Cashier for receipt type (i.e., Digital Only, Digital and Paper, or Paper Only).
Step 3: For ‘Digital Only’ and ‘Digital and Paper’, either the Customer enters their email address OR the POS automatically populates the Customer’s email address from its database.
Step 4: The POS issues a Request web service call to flexEngage.
Step 5: flexEngage replies to the POS with a Response
Step 6: The POS processes the Response in 1 of 4 conditions:
6A: ‘Digital Only’ Success - A ‘Digital Only’ request was received and successfully processed.
6B: ‘Digital and Paper’ Success - A ‘Digital and Paper’ request was received and successfully processed.
6C: ‘Paper Only’ Success - A ‘Paper Only’ request was received and successfully processed.
6D: Error - An error occurred that prevented a digital receipt from being processed.
Steps 7: The POS may need to display a confirmation message.
7A: The POS displays a confirmation message, “A digital copy of the receipt has been sent to the customer.”
7B: The POS displays a confirmation message, “A digital copy of the receipt has been sent to the customer.”
7D: An error occurred. The POS displays a notification message, “The digital receipt service is unavailable.
A paper receipt will be printed.”
Step 8: The POS may need to print a paper receipt.
8B: Since the customer requested both a ‘Digital and Paper’ receipt, the POS must also print a paper receipt.
8C: Since the customer requested a ‘Paper Only’ receipt, the POS must print a paper receipt.
8D: Since an error occurred, a digital receipt cannot be created, and the POS must print a paper receipt.
Step 9: The POS proceeds with the next transaction.
NOTE: The web service call follows a request/response protocol. Your integration is expected to read and process the flexEngage service responses. The responses contain info needed for your POS workflow.
The purpose of this service is to send customer, transaction, tender and item information to flexEngage. The entire transaction is then digitized for the end consumer. Detailed statistics and analytics are provided to the merchant.
Request: This is the web service call made by the POS to send transaction information to flexEngage. It determines whether to generate a digital receipt.
Response: This message is returned by flexEngage to provide the POS with additional instructions for if printing a receipt is required and to communicate a digital receipt confirmation or error/warning message.
NOTE: The POS should not close out the transaction until the Response is received and processed.
You should be familiar with the Request JSON message. Refer to
POST /merchants/{merchantId}/receipts in the
Receipts API reference for a full description of all the elements.
The Request Message is an REST web service call and the JSON contains 4 types of data:
Customer, Receipt/Transaction, Store, and Workstation Information varies depending on the transaction. Specific examples on how to send these elements are addressed in the Request Field Reference and Receipt Data Elements.
Review the complete JSON in the Receipts API reference for complete information. See the Request Field Reference for the areas that require special attention.
The Response Message is sent in response to your Request. See the Receipts API reference for the response schema. Below are some examples of error messages.
| SAMPLE MESSAGE | NOTES |
|---|---|
|
HTTP Status: 200 This response is sent when a transaction is successfully received by flexEngage. A unique ReceiptID is returned that can be used with the flexEngage PDF retrieval web service to get a PDF version of the receipt for printing. Display a POS confirmation message stating: "A digital copy of the receipt has been sent to the customer." |
| SAMPLE MESSAGE | NOTES |
|---|---|
|
HTTP Status: 200 This response is sent when a transaction is successfully received by flexEngage. A unique ReceiptID is returned that can be used with the flexEngage PDF retrieval web service to get a PDF version of the receipt for printing. DO NOT Display a POS confirmation message stating: "A digital copy of the receipt has been sent to the customer." |
| SAMPLE MESSAGE | NOTES |
|---|---|
|
HTTP Status: 403 This response is received if a Merchant ID is invalid or inactive. |
| SAMPLE MESSAGE | NOTES |
|---|---|
|
HTTP Status: 422 This response is received if there is a problem with the data in the Request and flexEngage cannot process it. In this case, the receipt date was sent in the incorrect format. Display a POS error message stating: "The Digital Receipt service is currently not available. A paper receipt will be printed." A paper receipt must be printed for the customer. |
This document makes some assumptions that the integrator should be aware of and conform to. You can greatly reduce your effort by reading this section as it contains steps to avoid the most common reasons for re-work and troubleshooting:
<ReceiptBarcodeType> does not matter to you, use a variable
length type like Code128. If <ReceiptBarcodeType> is blank, flexEngage defaults to “Code128”.Below are some example response messages for common error conditions. The integrations’ ability to log or respond to these can greatly speed up troubleshooting.
| HTTP Authentication Error — 401 Unauthorized |
|---|
|
| Merchant ID Inactive / Incorrect Merchant ID — 403 Forbidden |
|---|
|
| Missing Required Element (Item Name Example) — 422 Unprocessable Entity |
|---|
|
| Max Length Exceeded (Store Name Example) — 422 Unprocessable Entity |
|---|
|
| Invalid Format (Receipt Date & Revision Date Example) — 422 Unprocessable Entity |
|---|
|